
Moisture on walls can feel alarming and confusing. However, you can usually trace it to a few common sources. This guide explains what you are seeing and why it happens. Additionally, you will learn practical steps to dry walls and prevent repeat issues. You will also learn when the problem signals hidden damage. Therefore, you can protect your home and your indoor air.
You might notice damp patches, water beads, or peeling paint. Meanwhile, musty odors may show up in the same room. These signs often worsen during cold snaps or humid weeks. Consequently, you may worry about mold or structural problems.
This article covers identification, root causes, and lasting solutions. Furthermore, it explains warning signs that need professional help. You will leave with a clear plan to tackle moisture safely.
Moisture on Walls: What It Looks Like and When It Shows Up
First, moisture on walls appears in several easy-to-spot ways at home. For example, you may see dark drywall, bubbling paint, or damp streaks.
Next, many homeowners notice moisture on walls in bathrooms, kitchens, and basements. However, it can also show up on cold, exterior-facing bedroom walls in winter.
Then, the timing often helps you narrow down the cause quickly. For instance, morning dampness during cold weather often points to condensation.
Also, the damp area may stay in one spot for several days. Meanwhile, it may spread after heavy rain, cooking steam, or long showers. In addition, baseboards can feel wet and trim can warp slightly. As a result, the wall may soften and sound hollow when tapped gently.
Finally, track these patterns for a week before you start repairs.
Root Causes of Moisture on Walls and How They Happen
First, moisture on walls usually comes from air, plumbing, or ground water. Therefore, you must match each source to the pattern you see.
Next, map the damp area height, width, and edges with painter’s tape. Also, note if it worsens after showers, cooking, rain, or cold nights. However, a low patch with salts often suggests rising damp or seepage. In contrast, mid-wall rings or drips often point to hidden plumbing leaks.
Then, check humidity with a hygrometer, aiming for forty to fifty-five percent. Meanwhile, inspect outside for overflowing gutters, cracked caulk, and wet siding. Finally, document findings with photos, so repairs target causes, not symptoms.
Drying Clothes Indoors: Poor Ventilation and Trapped Humidity
First, bathrooms and kitchens release water vapour during showers, cooking, and cleaning. However, without an outdoor vent, that vapour stays trapped near cooler walls.
Next, humid air condenses on paint, grout, and drywall when airflow is weak. Also, fans venting into attics can push moisture back into living areas. Therefore, keep doors slightly open, and run extraction after each shower.
Meanwhile, avoid drying clothes indoors in bathrooms without reliable extraction. For example, fogged mirrors lasting hours signal humidity is not leaving. Then, clean fan grilles and ducts, because dust reduces airflow quickly. Finally, use a hygrometer, so you confirm humidity drops below sixty percent.
Condensation on cold interior walls
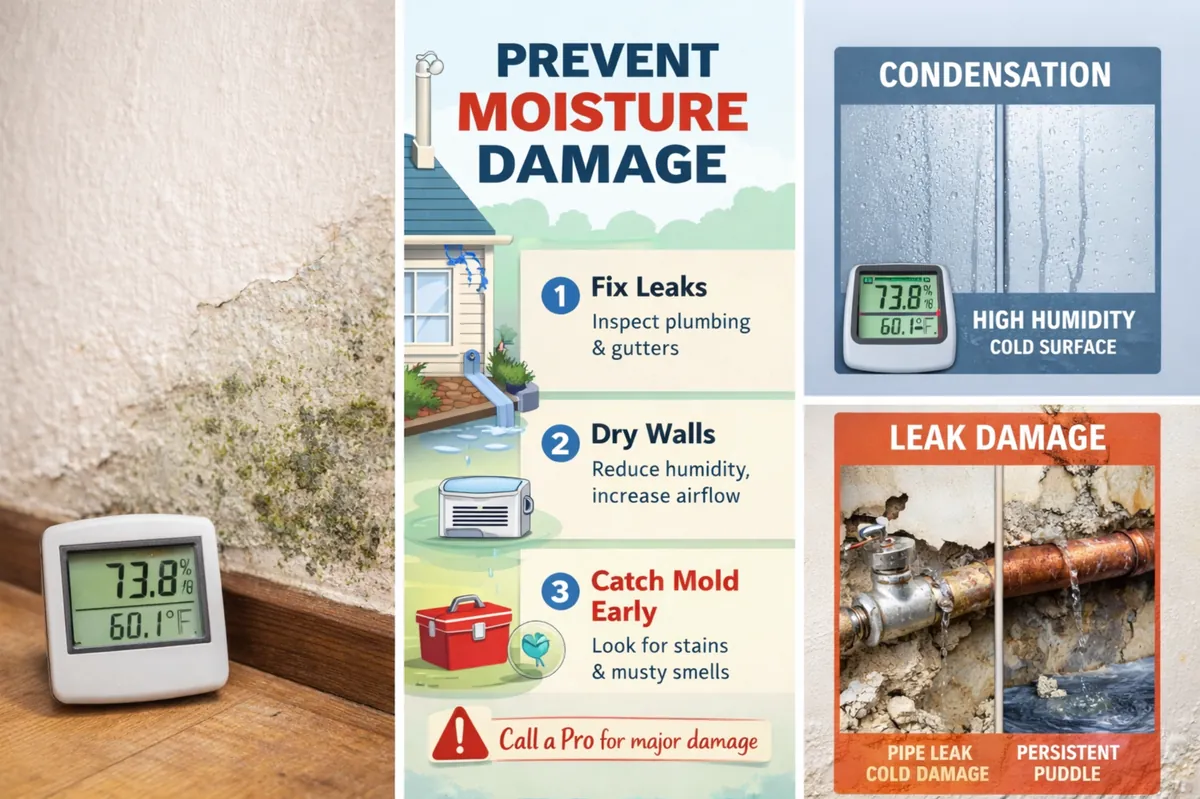
Condensation happens when warm air hits a cold surface. Therefore, water droplets form even without a leak. This often affects exterior walls in winter. Additionally, it can occur behind furniture that blocks air circulation.
High indoor humidity raises the risk. However, low wall insulation also plays a role. Cold corners and window surrounds collect moisture first. Consequently, you might see small beads or damp streaks.
For instance, a north-facing bedroom wall may feel damp each morning. Meanwhile, the dampness fades when the room warms. You might also notice mildew along the baseboard. Thus, condensation becomes the likely cause.
Drying clothes indoors: Plumbing Leaks Inside Walls
First, hidden plumbing leaks soak drywall from the inside and spread quietly. However, the wall surface can look normal until damage becomes obvious.
Next, watch for stains that grow in a ring or turn darker over time. Also, feel for cool, damp drywall, or soft spots near baseboards. Therefore, do not paint over marks before confirming the source.
Then, leaks often come from supply lines, drains, valves, or loose fittings. In addition, a slow drain leak can wet framing for weeks without puddles. For example, pinholes may spray intermittently and leave scattered spotting and odor.
Meanwhile, check if the patch worsens after showers, dishwashing, or flushing toilets. So, run one fixture at a time and recheck the stain after thirty minutes. Also, listen for dripping at night when the house is quiet.
Finally, act fast if the area feels soft, swollen, or crumbly around fasteners. Consequently, shut off the nearest valve and call a plumber if needed.
Rainwater Intrusion: How to Tell It From Indoor Humidity
First, rainwater can enter through damaged roofing, siding, or window seals. Therefore, wet walls often appear after storms or wind-driven rain events. In addition, moisture can run along studs and show far from entry points.
Next, check common entry routes like cracked caulk and failed flashing. However, missing shingles can also drive water into wall cavities quickly. Also, overflowing gutters can soak fascia, siding, and window trim repeatedly. As a result, water finds small gaps and travels inward behind finishes.
Then, look for stains near windows, upper corners, or ceiling edges after rain. For example, drywall beside a window may darken within hours after storms. Meanwhile, the area may dry during sunny weeks and return later. So, compare the timing of stains with recent rainfall patterns.
Finally, inspect outside for peeling paint, soft trim, and gaps at joints. Consequently, reseal small gaps and repair flashing before repainting indoor walls.
Rising Damp From the Ground
First, rising damp happens when groundwater wicks upward through porous masonry. Therefore, it usually affects basements and ground-floor walls in older buildings. In addition, you may see a damp band starting near the floor line.
Next, look for crumbling plaster, flaking paint, and soft skirting boards. Also, white, dusty salt deposits often appear as the wall dries. However, these salts can return quickly when moisture keeps feeding upward. As a result, paint may blister and peel again even after repainting.
Then, check outdoor drainage, because poor runoff keeps soil saturated near foundations. For example, short downspouts and clogged gutters can dump water beside the wall. Meanwhile, missing vapour barriers or damaged damp-proof courses worsen the problem. So, compare dampness patterns after rain, snowmelt, and long wet seasons.
Finally, reduce ground moisture first, then dry and repair interior materials safely. Consequently, improve grading, extend downspouts, and avoid sealing damp walls too soon.
Solutions and Fixes for Moisture on Walls
First, treat moisture on walls as a safety issue, not cosmetic. Next, ventilate the room, wear gloves, and keep children away.
Then, dry the area with airflow, steady heat, and a dehumidifier. Also, photograph stains daily, because patterns reveal the real moisture source. However, avoid sealing or painting until readings stay below sixty percent. Therefore, test for leaks, rain entry, and condensation before patching drywall.
In addition, fix the cause first, so repairs do not fail again. For example, improve extraction, extend downspouts, or replace damaged flashing quickly. Finally, replace wet insulation, then rebuild with mould-resistant primer and paint.
Immediate Steps to Dry a Damp Wall Safely
First, reduce room humidity fast by running extraction fans or opening windows. Next, start a dehumidifier and set a target between forty-five and fifty-five.
Then, move furniture at least six inches away to restore airflow. Also, lift wet rugs and dry floors to stop hidden damage. However, switch off nearby outlets if water is dripping or pooling.
Meanwhile, blot surface water with towels and replace them as they saturate. In addition, avoid spot-heating one area, because plaster can crack badly. Instead, aim a fan along the wall for gentle, even drying. Therefore, keep doors closed if other rooms feel cooler or already damp.
Finally, check the wall twice daily with a hygrometer or moisture meter.
Afterward, remove peeling paint and wet insulation only after everything is dry. Then, repaint with a mould-resistant primer, so the finish lasts longer.
DIY Fixes for Ventilation and Condensation
First, improve airflow in bathrooms and kitchens before moisture settles on walls. Next, run the extractor during use, then for twenty minutes afterward.
Also, keep the door slightly ajar to help fresh air enter. In addition, wipe wet tiles and painted surfaces right after showering. However, do not ignore window condensation, because it signals persistent humidity. Therefore, cover boiling pots and vent the range hood outdoors daily.
Meanwhile, rearrange furniture so air moves behind dressers on exterior walls. As a result, surfaces stay warmer, and moisture is less likely to form. Finally, add insulation where accessible, such as attic knee walls and rims.
Fixes for Plumbing Leaks and Hidden Water
First, confirm a leak by checking patterns, not guesses, in daily use. Therefore, watch the water meter when all fixtures are turned off.
Next, look for damp cabinets, loose toilet bases, or slow drains nearby. In addition, inspect shutoff valves and supply lines for corrosion or drips. However, remember that small leaks can run for weeks unnoticed.
Then, stop water flow quickly if you find an active leak source. Also, do not delay repairs for small drips, because damage spreads fast. As a result, framing can rot and pests may move into damp cavities.
Finally, cut a small test opening only if you need confirmation. Meanwhile, keep it minimal and away from wiring and outlet boxes. Therefore, dry the cavity with a fan after repairs, so materials recover.
Prevention and Long-Term Moisture Control
First, keep outdoor water draining away from your foundation at all times. Therefore, clean gutters regularly and extend downspouts several feet from walls.
Next, slope soil away from the house to prevent pooling near walls. Also, avoid piling mulch against siding, because it holds moisture.
Then, seal exterior gaps around windows, vents, and pipe penetrations carefully. However, choose sealants that match each surface to prevent peeling later. In addition, repair damaged flashing and replace cracked caulk before storms. As a result, rain stays outside and away from wall cavities.
Meanwhile, control indoor humidity year-round with consistent ventilation and good habits. So, run kitchen and bath fans during use, then for twenty minutes. Finally, aim for forty to fifty-five percent humidity to prevent repeats.
When to call an expert
Call a professional when you cannot find the source. Therefore, get help if moisture spreads or returns quickly. Seek assistance if you suspect roof or foundation problems. Additionally, call if the wall feels soft or unstable.
Professionals can use moisture meters and thermal imaging. However, you still need a clear history of when issues occur. Share photos and notes about weather and appliance use. Consequently, diagnosis becomes faster and less invasive.
If mold is widespread, get qualified remediation advice. Meanwhile, avoid disturbing large areas of suspected mold growth. Protect your lungs and avoid cross-contamination. Thus, you keep your home safer during repairs.
Warning Signs Moisture on Walls Is Getting Worse
First, early warning signs help you act before repairs become extensive. Therefore, watch for paint that bubbles, peels, or blisters repeatedly. Next, note stains that expand week by week or after wet weather.
Also, look for mould-like spotting, fuzzy growth, or dark speckling on surfaces. However, remember that some marks are mineral salts, not active mould. In addition, soft drywall and crumbling plaster are stronger red flags. As a result, the wall may be losing strength beneath the surface.
Meanwhile, pay attention to electrical issues near the damp area immediately. So, treat flickering lights, warm outlets, or tripped breakers as urgent signs. Also, check for warped flooring and swollen baseboards along wet edges. Finally, call a professional if symptoms spread or return quickly.
Conclusion
First, moisture on walls usually has a clear cause you can spot by patterns. Therefore, start by drying the area and improving airflow in that room.
Next, rule out plumbing leaks and rain intrusion with careful, simple checks. Also, track humidity and temperature, because condensation follows cold surfaces. In addition, manage gutters, drainage, and sealing to prevent repeats. As a result, you protect paint, plaster, and hidden framing behind walls.
Finally, call a qualified professional if damage spreads or mould appears.