
A damp patch is not a diagnosis. Rising damp, water driven through the wall by rain, and a leak feeding one spot all end up as the same brown stain above the skirting board, and the three of them need three different pieces of work. Pick wrong and the money goes into the wrong hole in the wall. Worse, the usual order is backwards: the treatment gets chosen first, from a brochure, and the evidence is assembled afterwards to justify it.
What follows is the order a surveyor actually works in, cheapest test first.
Before you call it rising damp, rule out the two cheap explanations
Two causes account for a large share of complaints and neither needs a wall opened up.
The first is condensation. It wets the surface, not the core, and it chooses cold spots — reveals, corners, behind furniture on an external wall. It has its own test sequence, which is a separate question worth settling first, because every pound spent on a chemical barrier is wasted if the water came out of the air inside the room.
The second is a leak. A gutter spilling at one point soaks a vertical strip of wall and nothing either side of it; an overflow pipe, a cracked hopper or a blocked downpipe do the same. Where a gutter spills tells you which fault it has, and that reading is free.
The joint position statement published by RICS with Historic England and the Property Care Association puts this sequence in writing: it “assumes that a non-invasive inspection will be undertaken initially”, with invasive work only if needed, and for repairs it says to deal with the obvious defects first, then “allow a period for monitoring and natural evaporation, and reassess before moving on to other treatments” (RICS, Investigation of moisture and its effects on traditional buildings, 2022). Fix the gutter, wait, measure again. A wall that is drying does not need a barrier injected into it.
What a moisture meter really measures, and why it over-reads rising damp
The hand-held meter with two pins is the instrument almost every survey opens with, and its limits are the single biggest source of a wrong rising damp verdict.
It measures electrical resistance between the pins, and reports the result on the WME scale — wood moisture equivalent, so a reading on brick is expressed in the units of wood in equilibrium with it. Protimeter’s own guidance treats anything “above 20% anywhere and in any material” as red, with red corresponding to an equilibrium humidity “in excess of about 85 percent”; 75% relative humidity is the safe band and sits at 16 to 18% moisture content in wood (Amphenol Advanced Sensors, Protimeter moisture measurement review).
Here is the catch. Salts carried into the wall make it conduct, so a salty plaster surface reads wet when it is not. The same document is blunt that salts “can cause electrical moisture meters to over-read”, and the 2022 RICS statement asks surveyors to understand “how salts can move through the building fabric and how this might influence a resistance meter”. A high surface number therefore proves nothing on its own.
Two moves recover a usable reading. Deep wall probes reach past the contaminated plaster into the masonry, where Protimeter’s guidance says a true reading is obtainable even with salts present. And readings “taken inside an affected wall at just above skirting level will not be significantly affected by salts” — which gives the most useful negative result in the whole exercise: if the inside of the wall is dry, “the problem cannot be one of rising damp”, and surface moisture or condensation becomes the likely answer.
The sample that settles it, and how the sampling method can destroy the answer
When the surface meter and the wall disagree, the next step is a physical sample. Two methods are in field use: a calcium carbide meter, which reacts drilled material with carbide and reads the acetylene pressure produced, and oven drying in a laboratory, with a balance sensitive to one milligram, drying tins and a desiccator. The Walloon heritage agency specifies the carbide bomb at the most sensitive points, with readings recorded on a plan, and notes comparative weighing as the alternative that needs more handling and lab access (AWaP, mise en œuvre d’une barrière étanche contre les remontées capillaires).
How the sample is taken matters more than most reports admit. The German WTA guideline 4-11-2016/D grades the methods by how much water the act of sampling drives off: hammer and chisel, at least 50 g, leaves the water content unchanged and allows exact determination; an angle cutter taking a plate of at least 10 × 10 cm changes it slightly, practically insignificantly; core drilling with a crown of at least 70 mm changes it depending on method and material; and drill dust, taken with a bit of at least 20 mm at no more than 300 rpm, is “considerably changed” and usable only for a rough estimate (WTA, Weber, sampling and assessment). A number from a fast dry drill is not evidence. Ask which method produced it.
The arithmetic is simple enough to check yourself. Moisture content by dry mass is
w = (wet mass − dry mass) / dry mass × 100
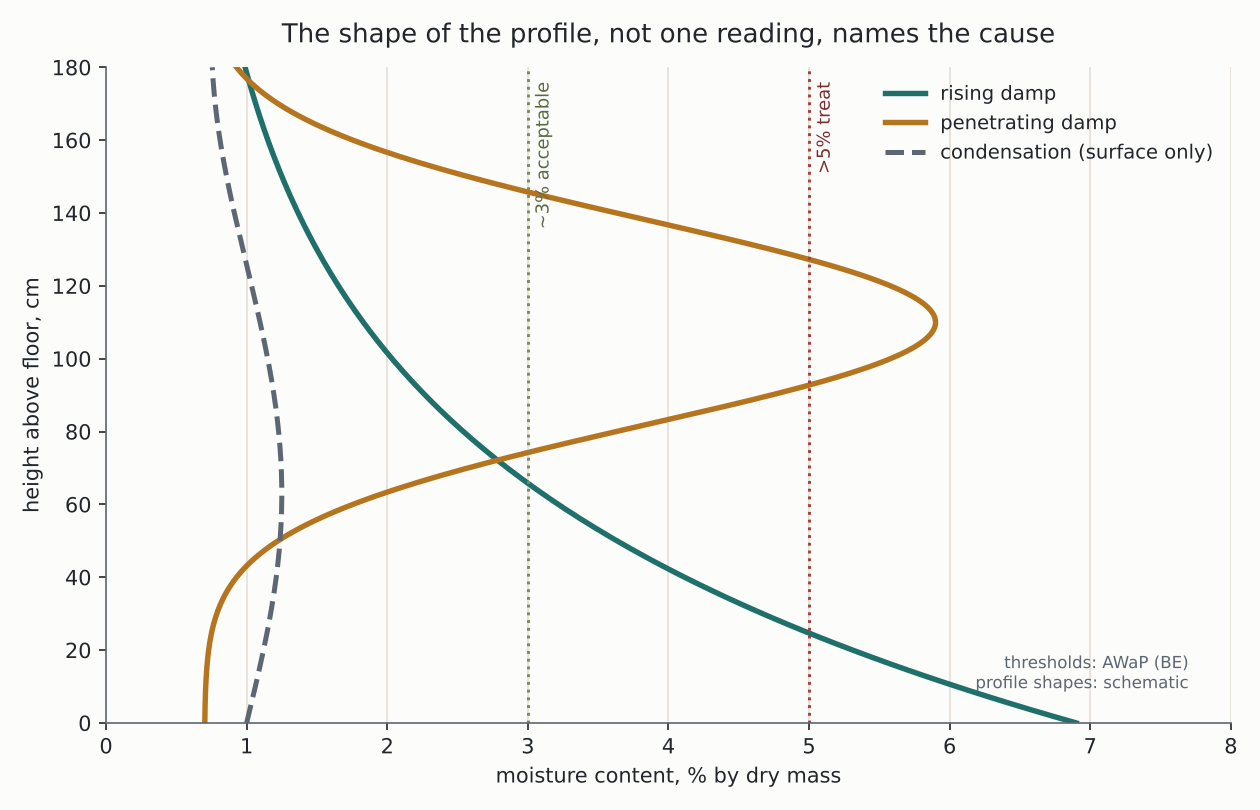
so a sample weighing 48.6 g wet and 46.1 g after drying gives (48.6 − 46.1) / 46.1 × 100 = 5.42%. The AWaP guidance treats roughly 3% by mass as acceptable in masonry and above 5% as needing treatment, so that sample is over the line. A second sample from higher up the same wall at 47.3 g wet and 46.9 g dry gives 0.85% — and the gap between the two is the actual finding, because it is the shape of the profile up the wall, not one number, that identifies the cause.
The German practice adds a second ratio, the Durchfeuchtungsgrad: water content divided by the material’s maximum water uptake, as a percentage. Feed in the 5.4% above, and a maximum uptake of 12% by mass for that brick as reported by a lab, and you get 5.4 / 12 × 100 = 45% — the figure WTA’s own slides quote as typical under site conditions, against 95% under test saturation. The point of the second ratio is that 5% in a dense engineering brick and 5% in a soft handmade brick are not the same condition at all.
The geometry rising damp has to show, or it is not rising damp
Capillary rise is not an opinion; it leaves a signature, and every element of it is checkable.
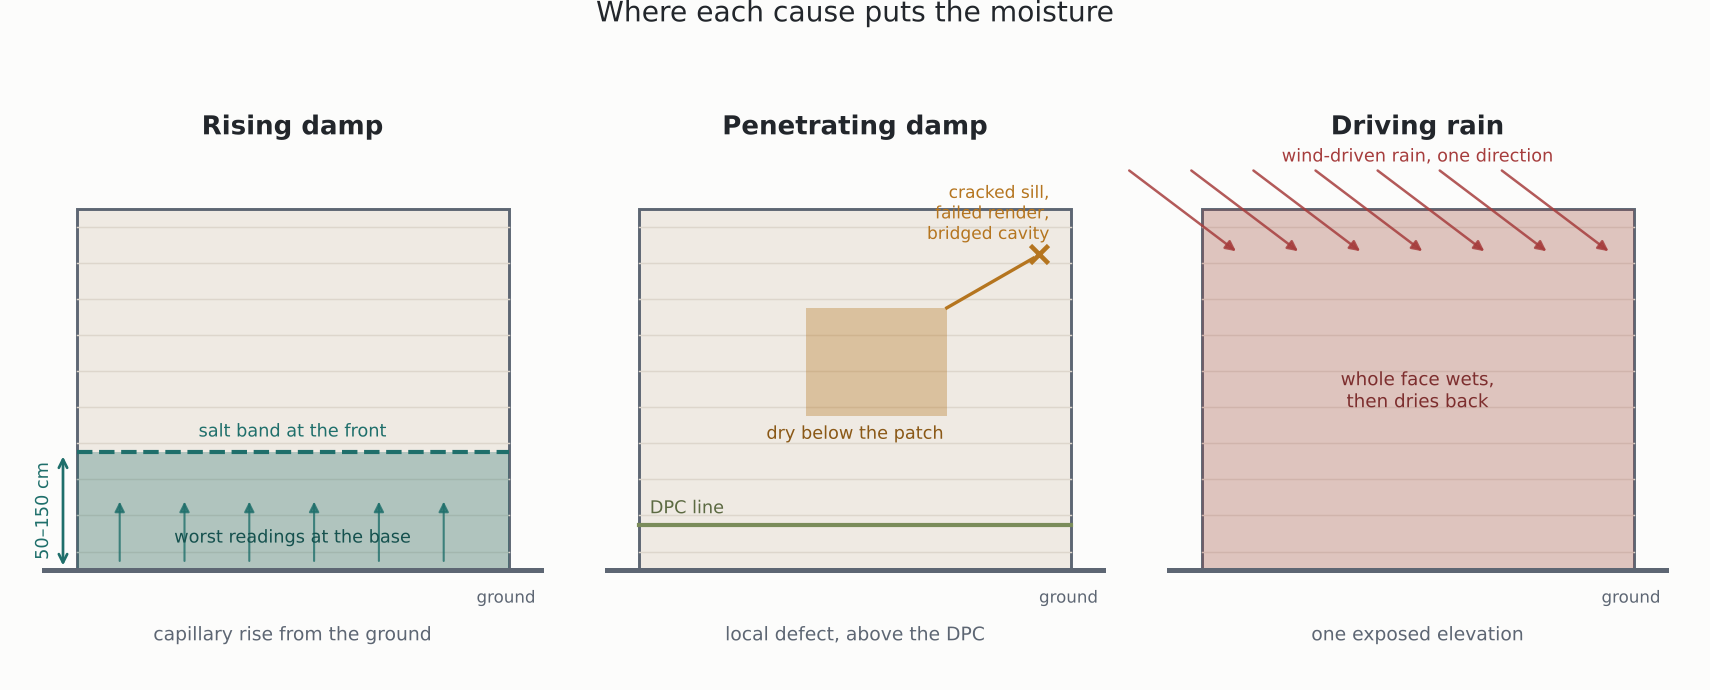
Height first. The AWaP guidance gives 50 to 150 cm as the usual band, higher in confined spaces, which is why a stain starting a metre and a half up with dry brickwork below it is something else. The front is typically a darker band with the worst readings at the base.
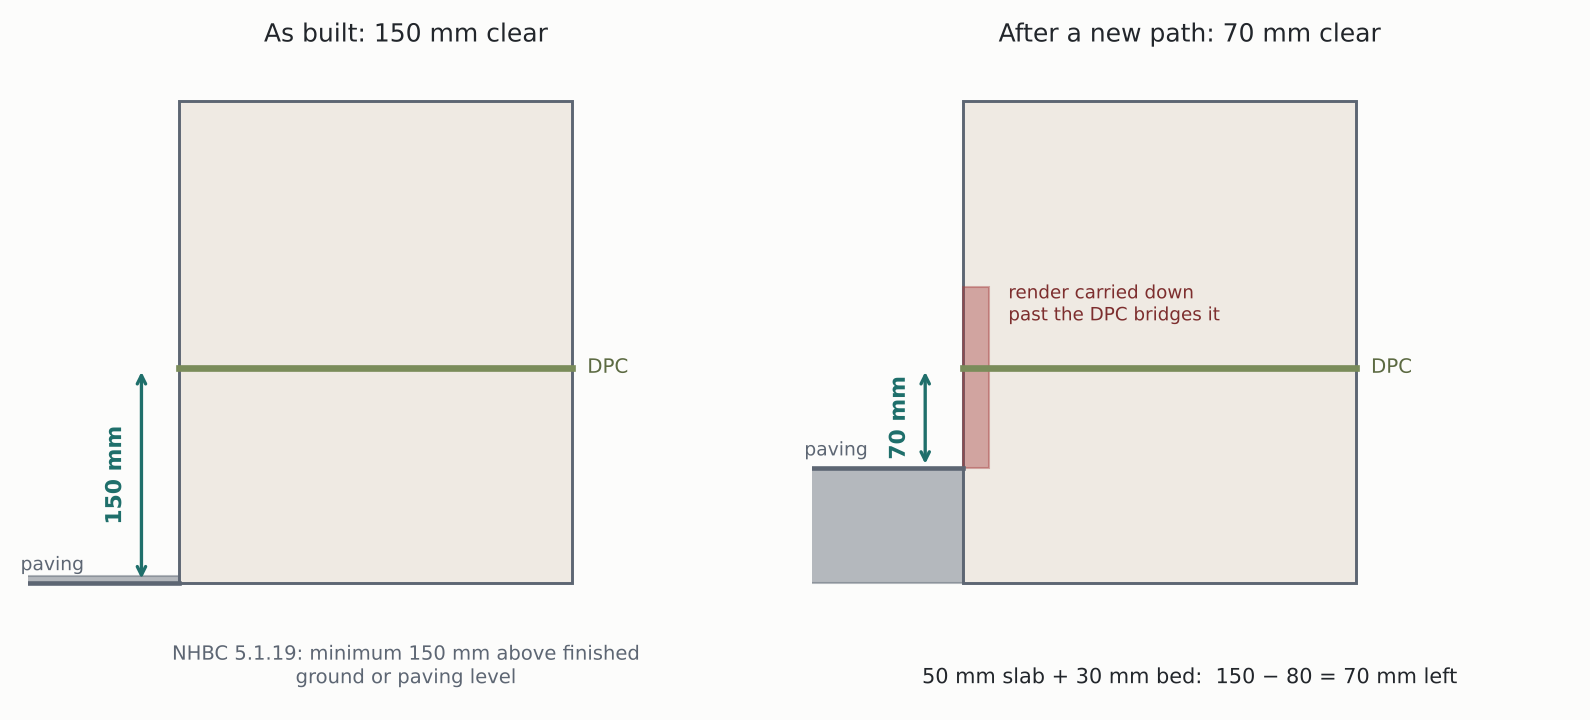
Then the damp-proof course. NHBC Standards require a DPC “positioned a minimum of 150mm above external finished ground or paving level”, welded or lapped by 100 mm minimum, and linked with any floor DPM; a brick DPC is two courses of engineering bricks in broken bond, bedded in 1:¼:3 cement:lime:sand mortar (NHBC Standards 5.1.19). Find the line, then measure down to the path with a steel rule.
That 150 mm is where most real cases are decided, and the arithmetic is unforgiving. A path laid over the original one with 50 mm slabs on a 30 mm bed leaves 150 − 80 = 70 mm. One more resurfacing, or a render coat carried down past the line, and the barrier is bridged — water simply walks around it. A bridged damp proof course has its own set of tell-tales, and it is a groundworks job, not an injection job.
Salts are the third element. Rising damp carries nitrates up from decomposing organic matter in the soil, and they crystallise as the wall dries, lifting plaster and blooming on the surface. AWaP asks for salt concentration to be analysed before treatment and again 6 to 12 months afterwards. White bloom on a wall after treatment is a predictable stage, not a failure, though it is routinely sold as one.
Penetrating damp and driving rain: the pattern lives in the weather
Driven rain is the diagnosis that gets missed, because its evidence is a timetable rather than a mark. Patches appear during or shortly after a wind-driven downpour from one direction, then fade. They sit well above the DPC, they follow a defect — a cracked sill, a failed render patch, a bridged cavity — and they ignore the ground entirely.
The mechanism is not mysterious. The Brick Development Association describes water moving through solid masonry both by diffusion through microscopic voids and by flow through hairline or larger cracks, with resistance rising as the wall gets thicker, and warns that prolonged wind-driven rain can penetrate solid masonry whatever the brick’s absorption. The brick-to-mortar interface is the weak line; stretcher bond has about 60 cross joints per square metre, and these are commonly underfilled by the habit the trade calls tipping and tailing. Tooled joints, bucket-handled or struck weathered, resist penetration better than recessed or raked joints, which form ledges and are only recommended in sheltered locations. Exposure is graded in four categories from the local spell index of BS 8104, and full-fill cavity insulation is not to be used in areas of severe exposure (Brick Development Association, Resisting rainwater penetration, 2023).
For a cavity wall the design assumption is that water gets through the outer leaf and runs down the cavity, with trays, stop ends and weepholes sending it back out. So penetrating damp inside a cavity wall usually means something is bridging the cavity: mortar droppings on a tie, a tie sloping the wrong way, or insulation installed where it should not have been.
What does not work, and is sold anyway
Injecting a chemical barrier before the diagnosis. It treats rising damp, and only rising damp. Against driven rain, a bridged DPC or a leak it does nothing, and it leaves the owner certain the problem is solved.
Replastering over salty masonry. The salts stay, they are hygroscopic, and they will wet the new finish from behind. Salt analysis before and after exists precisely for this.
Waterproof render or a sealant coat over a solid wall. Water already in the masonry now has one fewer face to evaporate from. The damp moves rather than leaves — commonly upward, past the new coating.
A dehumidifier as the cure. It is useful while a wall dries, and useless as a remedy. For scale, AWaP puts the natural drying of a 60 cm brick wall at roughly a year, which is also why a survey that measures a wall three weeks after a gutter repair is measuring the gutter, not the wall.
Where the line of competence sits
Reading the spill pattern, measuring down from the DPC to the path, and comparing meter readings at two heights are all owner-level work. A gravimetric or carbide profile taken properly, a salt analysis, and a judgement about cavity bridging are not.
When you do commission a report, judge it on its evidence, not its conclusion: which sampling method, at what heights, with what result, and whether obvious defects were repaired and the wall monitored before treatment was proposed. A report that concludes rising damp from surface meter readings alone has skipped the one step that would have tested the claim. What a credible damp survey contains is worth knowing before you commission one.
Costs vary far too much by region and access to be worth quoting here, and nobody can confirm a figure for you at three in the morning. Get the order of magnitude from two or three local contractors on the basis of a written diagnosis, and treat any quote that arrives without one as a sales document.
Sources
- RICS, Historic England and the Property Care Association — Investigation of moisture and its effects on traditional buildings (joint position statement, 2022) — non-invasive inspection first; repair obvious defects, then monitor and allow natural evaporation before further treatment; salts influence resistance meters.
- Amphenol Advanced Sensors — Protimeter moisture measurement review — WME scale; above 20% is the red zone; red equates to over about 85% equilibrium humidity; 75% RH equals 16–18% moisture content in wood; salts cause over-reading; deep wall probes; carbide and oven methods.
- WTA (Wissenschaftlich-Technische Arbeitsgemeinschaft für Bauwerkserhaltung und Denkmalpflege), Germany — sampling and assessment, citing WTA 4-11-2016/D — sampling methods and their effect on measured water content: hammer and chisel ≥50 g exact, angle cutter plate ≥10 × 10 cm, core ≥70 mm, drill dust ≥20 mm bit at ≤300 rpm usable only for rough estimates; Durchfeuchtungsgrad 95% test / 45% site.
- Agence wallonne du Patrimoine (Belgium) — Mise en œuvre d’une barrière étanche contre les remontées capillaires — rise usually 50–150 cm; carbide bomb measurement recorded on a plan; about 3% by mass acceptable, above 5% needing treatment; nitrates from the soil; salt analysis before and 6–12 months after; about a year to dry a 60 cm brick wall.
- NHBC Standards 5.1.19 — Damp proof course — DPC minimum 150 mm above external finished ground or paving level; laps 100 mm minimum; linked with the DPM; brick DPC of two courses of engineering bricks in 1:¼:3 mortar.
- Brick Development Association — Resisting rainwater penetration, Technical Guide, 2023 — diffusion and crack flow through solid walls; about 60 cross joints per square metre in stretcher bond; tooled versus recessed joints; four exposure categories from the BS 8104 local spell index; full-fill insulation not for severe exposure; cavity trays, stop ends and weepholes.